
Sound deadening: what it actually does and whether it is worth the effort
Sound deadening is three different jobs, not one. Panels vibrate, surfaces rub and airborne road noise bleeds through gaps. Each problem needs a different material in a specific location. Get the order right and a decent partial install will sharpen your door speakers, kill panel rattle and cut motorway drone. Get it wrong and you will have mats falling into door cavities, hidden rust and panels that no longer fit.
This guide covers material types, placement priority, realistic UK costs, weight penalty, what the MOT does and does not check, and the failure modes worth knowing before you start.
Prerequisites
Before you touch anything, gather what you need. Skipping the roller is the single most common reason installs fail.
Tools required:
- Trim removal tool (plastic preferred to avoid scratching)
- Heavy-duty scissors or craft knife
- 2-inch rubber hand roller. Dynamat’s dedicated roller costs £29.95 from Bass Junkies UK
- Isopropyl alcohol and clean lint-free cloths
- Torque wrench (seat bolt reinstallation)
- Smartphone or camera to photograph panel fixings before removal
Materials required, UK retail options (prices inc. VAT, October 2026):
- CLD mat (constrained layer damper): CTK Premium 2.2 mm butyl, 2.77 sq m pack at £199.98, or Dodo DEAD-EZY 20-sheet pack at £53.98 from Soundproofingshop.co.uk
- CCF (closed-cell foam): Dodo Thermo Liner 7 mm, 10 sq m roll at £119.99 from deadening.co.uk
- MLV (mass loaded vinyl) if floor blocking is the goal: check current stock at deadening.co.uk
- Panel wipe or additional IPA for surface prep
Kilmat is widely reviewed in US forums but is not stocked by mainstream UK car-audio retailers at time of writing. Verify availability before ordering.
Do not use asphalt-based roofing tape. It looks similar to CLD mat. Inside a warm cabin it melts, off-gasses fumes, loses adhesion and drops to the bottom of door cavities. Automotive-grade butyl rubber only.
Disconnect the battery before removing panels or working near bare metal and wiring. This prevents accidental shorts.
Step-by-step installation
Step 1. Decide your priority area
Treat doors first if car audio is your primary goal. Treat the firewall and wheel arches first if tyre or engine noise is the main complaint. For a full build, start at the firewall and work rearward, including wheel wells, floor pan and boot.
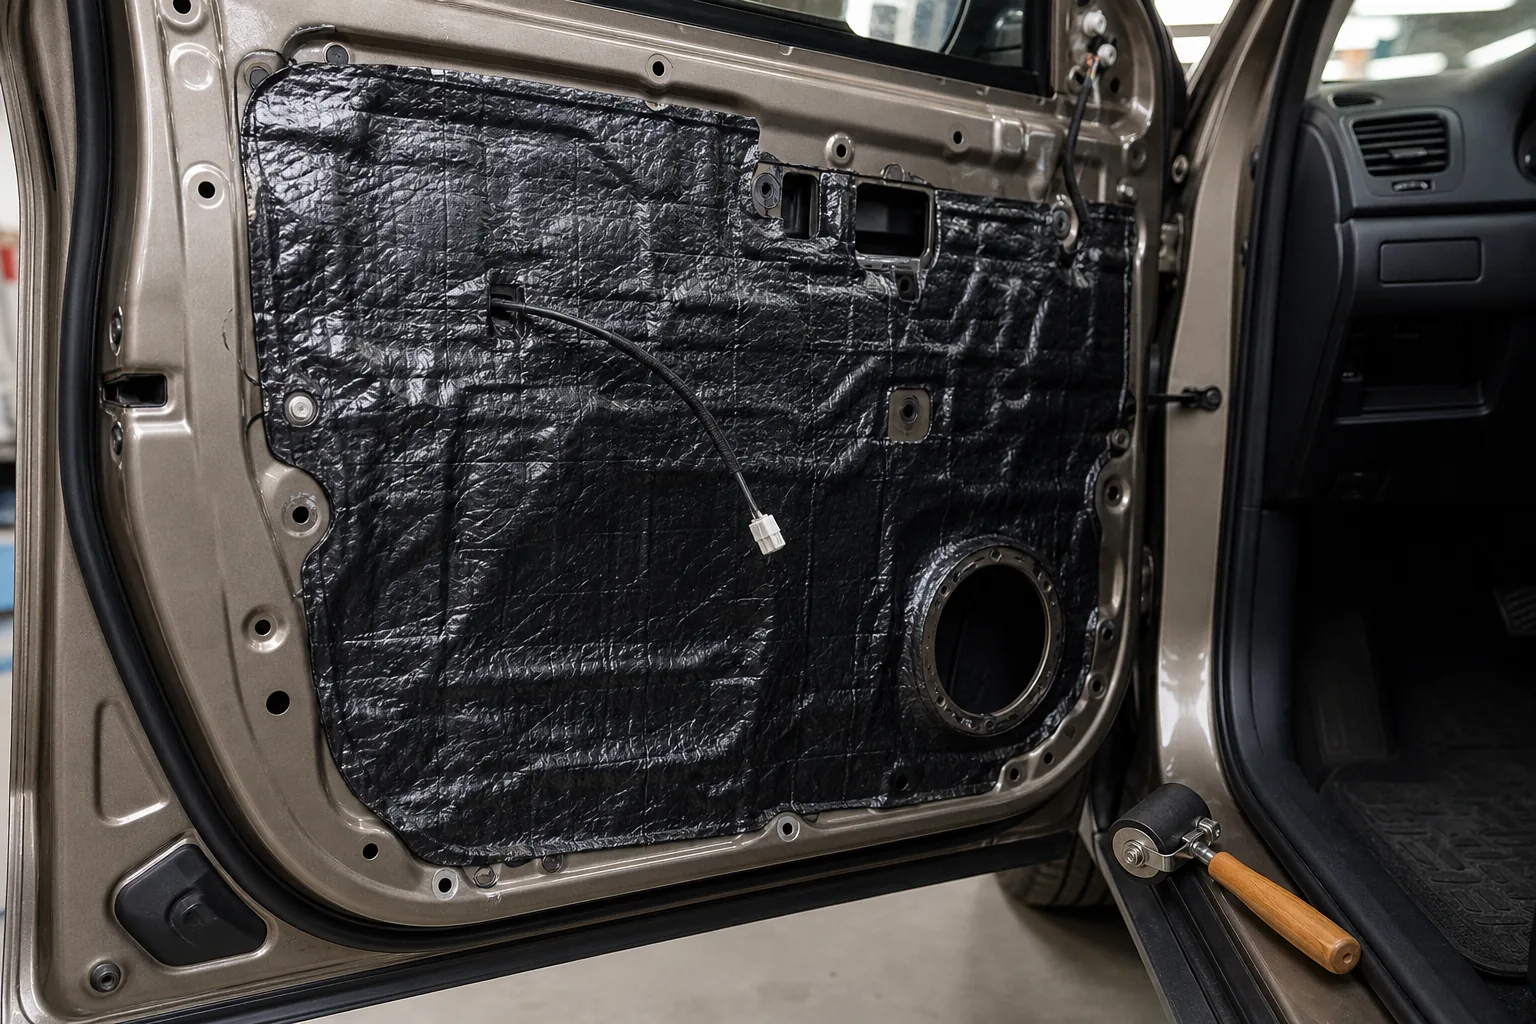
Doors offer the highest return on investment for speaker performance. A car door is a large hollow chamber of thin sheet metal sitting next to your ears. Treating it correctly turns that hollow chamber into a rigid, enclosure-like baffle that should improve mid-bass and reduce rattle.
Step 2. Remove the panel
Take off the door card or carpet section covering the area you are treating. Use a trim tool rather than a screwdriver to avoid snapping clips. Photograph every fixing point before you remove anything. Some screws hide under plastic caps or behind speaker grilles. Work slowly and note the order of removal.
Step 3. Clean the surface
Remove any dirt or old insulation, then wipe the bare sheet metal with isopropyl alcohol on a clean cloth and allow it to dry completely. CLD mat will not bond reliably to a contaminated surface. This step is not optional.
Step 4. Cut and apply CLD mat
For doors, aim to cover approximately 50 per cent of the outer door skin inside the cavity, then cover the inner door frame to seal factory access holes. You do not need to cover every square centimetre of a door to get the benefit. On floor pans and boots, coverage should be as complete as practical.
Peel the wax-paper liner and press the butyl side firmly onto the metal. Work from one edge and use your hands to push out any air as you go. Cut around braces, wiring and drain holes rather than covering them.
Step 5. Roll it out properly
This is the most critical step. Run the rubber roller firmly over every section of mat with enough pressure to force full contact between the butyl and the metal. Any air pocket between the butyl and the panel prevents the material from damping vibrations and can trap moisture, leading to hidden corrosion. Work in small sections and overlap your roller passes.
Step 6. Apply CCF layer (where required)
Closed-cell foam goes on top of the CLD layer or directly behind door cards and trim panels. It decouples plastic from metal, stopping the trim from resonating against the treated surface. It also adds a degree of thermal insulation. Do not use CCF as a substitute for CLD. They solve different problems.
Step 7. Apply MLV for floor and firewall blocking (if in scope)
Mass loaded vinyl blocks airborne road noise. It sits over the floor pan and firewall and requires seamless coverage to function. Any gap in the MLV layer is a gap for noise to travel through. Cut pieces to fit tightly against sills and around tunnel edges. MLV carries the greatest weight penalty of the three material types.
Step 8. Refit panels and seats
Check that trim panels still locate correctly over the mat layers before clipping them back. Thicker coverage behind a door card can prevent it from seating flush. Refit seats and torque all seat bolts correctly. A loose seat bolt will rattle on the first road test and you will spend an hour chasing a noise that is not the deadening.
Verification
Once everything is refitted, reconnect the battery and road test the car. Listen for rattles at bass frequencies that previously excited the panels. Check that door cards are flush and that no new creaks have appeared at the A-pillar or sill.
If you added subwoofer power, check the boot lid and number plate area separately. High-SPL systems can cause the boot lid to rattle even after the boot floor is treated.
MOT position: The DVSA MOT inspection manual requires testers to inspect exhaust silencers and under-bonnet noise deadening fitted as original equipment. It does not cover aftermarket CLD, CCF or MLV applied to doors, floors or boots. There is no MOT inspection item for the type of deadening covered in this guide. An MOT pass does not automatically confirm road legality for all modifications, but sound deadening itself carries no specific road-legality restriction in Great Britain. If you are using deadening to mask a modified exhaust, the exhaust system must still comply with The Road Vehicles (Construction and Use) Regulations 1986.
Weight: A typical full install adds less than 50 kg total, varying with coverage area, number of layers and material type. MLV for full-floor coverage can alone account for roughly 23 to 36 kg of that figure. For a road car, that is acceptable. For a track-focused build that still sees road use, think carefully about how much MLV you lay. Removing factory deadening from a road car to save weight gives you extra noise and vibration in exchange for minimal lap-time return.
Troubleshooting
Mat has dropped to the bottom of the door cavity. Asphalt-based product was used, or the surface was not clean before application. Strip everything out, clean the metal thoroughly with IPA, and start again with a proper automotive butyl mat.
Air pockets visible under the mat. The roller was not used with sufficient pressure. Re-roll with firm, overlapping passes. For stubborn areas, cut a relief slit and re-lay the section flat before rolling again.
Rust found behind a removed mat. Air pockets trapped moisture. Remove all the mat in the affected area, treat the corrosion properly, prime the bare metal and re-apply with correct roller technique. Do not lay fresh mat over active rust.
Door card will not refit or sits proud. The CLD or CCF layer behind the card is too thick for the original panel tolerances. Switch to a thinner CCF product and recheck the clearance before clipping the card back. Forcing it will crack the card or break the clips.
Smell in the cabin in warm weather. Asphalt product. Butyl rubber produces no significant odour. The only fix is full removal and replacement with correct material.
New creak from seat area after reinstallation. Seat bolts not torqued correctly. Remove the seat, confirm the correct torque figure for your vehicle from the workshop manual, and retighten to spec.
Related notes
Dynamat Xtreme’s two-sheet speaker pack at £24.99 from Bass Junkies is a cost-effective starting point if you want to treat door skins behind a single pair of speakers before committing to a full door install. It will not transform the car, but it is a useful proof of concept before you buy larger packs.
If you are building a high-power boot install, treat the spare-wheel well and boot floor at the same time as the subwoofer enclosure. Untreated boot metal acts like a second, uncontrolled subwoofer and will undermine the tuned output from your box regardless of how well the box is built.
For anyone sourcing materials in the UK, deadening.co.uk stocks Silent Coat, Dynamat and Dodo Mat across all three material categories. Soundproofingshop.co.uk carries CTK Premium and Dodo Mat ranges. Both ship to mainland GB addresses. Confirm Northern Ireland shipping separately before ordering, as some retailers apply different terms.
All prices quoted are from October 2026 listings. Check current stock and pricing before ordering, as car-audio retailers rotate stock regularly.